Hi guys, here's my table build.
This is all cedar. Started out with a basic frame. I knew from the beginning I wanted 4x4's in the corners. It's probably overkill but I'd like this to last a while. The cross braces are all 2x4's. Locking, swiveling casters on all 4 corners.
Image may be NSFW.
Clik here to view.
I found a local granite place that sold scrap pieces of granite and picked up a couple. The piece for the top is 2cm while the piece that goes under the egg is a 3cm piece. I'm using an egg holder as well, I just wanted to be sure there was plenty of thermal mass between the egg and the wood. Anyways, I cut the granite with my tile saw. It left a nice smooth edge - it's not nearly as polished as the top but I can live with it.
Image may be NSFW.
Clik here to view.
Next up I installed the top boards around the granite. The top is a 5/4 s4s cedar that I was lucky enough to find at Lowes. The egg support pieces are 2x6 cedar with notches cut into them to fit around the legs.
Image may be NSFW.
Clik here to view.
Once the top boards were in place I made the egg cutout. I used a Rockler hole cutting jig with a router. It worked perfectly. Initially I didn't have a router and was going to try to do it with a jigsaw but I know there's no way I would have gotten a decent looking circle that way. I figured I was going through all this trouble I might as well do it right.
Image may be NSFW.
Clik here to view.
I used a spiral upcutting bit and probably made 10-12 passes to get all the way through. Just dropped the bit a little each pass. I had stacked wood underneath so the circle didn't just drop out when I made it all the way through. I also attached a strip of wood to all the pieces that were going to come out so they all came out in one piece. Here's a picture part of the way through the circle cut.
Image may be NSFW.
Clik here to view.
I added more 5/4 boards to the sides and back and was left with this. You can see an air gap (daylight) at the back and also some gaps around the egg support wood. Maybe it isn't much but I wanted some air to be able to flow around that compartment where the egg will sit.
Image may be NSFW.
Clik here to view.
I also filled all the screw holes with a mixture of epoxy and sawdust. I didn't have a pocket jig and honestly I didn't want to go through the trouble of a pocket jig. I got the sawdust from my orbital sander - most of the wood was rough cut and I sanded it with the orbital down to 80 grit. The top was sanded to 120.
Image may be NSFW.
Clik here to view.
You can see that the area where the top granite will go has 2x4's that are sticking up a little. This is because the 2cm granite wasn't quite thick enough to match the 5/4 boards on top. This brought them to just about even.
Image may be NSFW.
Clik here to view.
After lots of research I just used Sikkens to stain the table. I ended up using the teak color. This is two coats worth. I forgot to take pictures in between coats. When I first put it on there were some brush strokes on the horizontal surfaces. The vertical surfaces were completely brush stroke free. Maybe I put it on too heavy, I don't know. Now that it's sat in the rain for a couple of weeks the brush strokes seem to have faded.
Image may be NSFW.
Clik here to view.
Image may be NSFW.
Clik here to view.
I still need to put some doors on the right side and mount my Shiner Bock bottle opener. Overall I'm happy with the way it turned out. I'd never built a piece of wood furniture before so I was just kind of winging it based on pictures others have posted. Hopefully someone else will get something out of these pictures as I did with everyone else's pictures.
This is all cedar. Started out with a basic frame. I knew from the beginning I wanted 4x4's in the corners. It's probably overkill but I'd like this to last a while. The cross braces are all 2x4's. Locking, swiveling casters on all 4 corners.
Image may be NSFW.
Clik here to view.

I found a local granite place that sold scrap pieces of granite and picked up a couple. The piece for the top is 2cm while the piece that goes under the egg is a 3cm piece. I'm using an egg holder as well, I just wanted to be sure there was plenty of thermal mass between the egg and the wood. Anyways, I cut the granite with my tile saw. It left a nice smooth edge - it's not nearly as polished as the top but I can live with it.
Image may be NSFW.
Clik here to view.

Next up I installed the top boards around the granite. The top is a 5/4 s4s cedar that I was lucky enough to find at Lowes. The egg support pieces are 2x6 cedar with notches cut into them to fit around the legs.
Image may be NSFW.
Clik here to view.

Once the top boards were in place I made the egg cutout. I used a Rockler hole cutting jig with a router. It worked perfectly. Initially I didn't have a router and was going to try to do it with a jigsaw but I know there's no way I would have gotten a decent looking circle that way. I figured I was going through all this trouble I might as well do it right.
Image may be NSFW.
Clik here to view.

I used a spiral upcutting bit and probably made 10-12 passes to get all the way through. Just dropped the bit a little each pass. I had stacked wood underneath so the circle didn't just drop out when I made it all the way through. I also attached a strip of wood to all the pieces that were going to come out so they all came out in one piece. Here's a picture part of the way through the circle cut.
Image may be NSFW.
Clik here to view.

I added more 5/4 boards to the sides and back and was left with this. You can see an air gap (daylight) at the back and also some gaps around the egg support wood. Maybe it isn't much but I wanted some air to be able to flow around that compartment where the egg will sit.
Image may be NSFW.
Clik here to view.

I also filled all the screw holes with a mixture of epoxy and sawdust. I didn't have a pocket jig and honestly I didn't want to go through the trouble of a pocket jig. I got the sawdust from my orbital sander - most of the wood was rough cut and I sanded it with the orbital down to 80 grit. The top was sanded to 120.
Image may be NSFW.
Clik here to view.

You can see that the area where the top granite will go has 2x4's that are sticking up a little. This is because the 2cm granite wasn't quite thick enough to match the 5/4 boards on top. This brought them to just about even.
Image may be NSFW.
Clik here to view.

After lots of research I just used Sikkens to stain the table. I ended up using the teak color. This is two coats worth. I forgot to take pictures in between coats. When I first put it on there were some brush strokes on the horizontal surfaces. The vertical surfaces were completely brush stroke free. Maybe I put it on too heavy, I don't know. Now that it's sat in the rain for a couple of weeks the brush strokes seem to have faded.
Image may be NSFW.
Clik here to view.
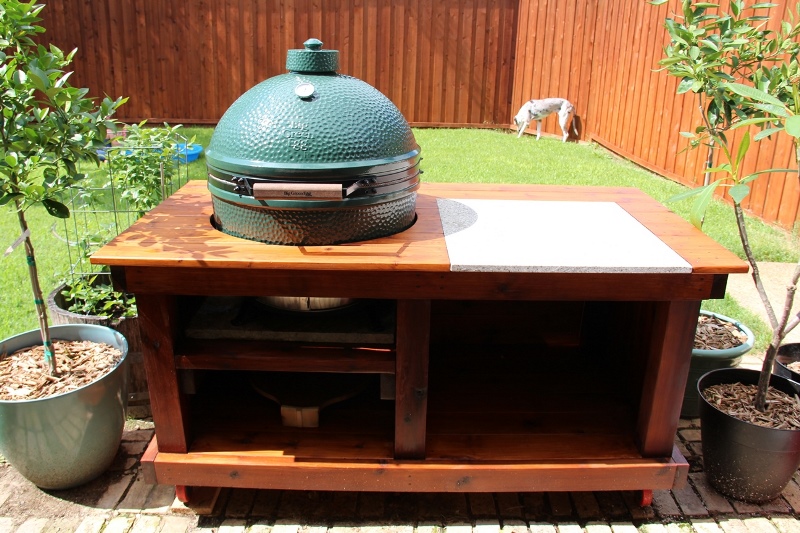
Image may be NSFW.
Clik here to view.

I still need to put some doors on the right side and mount my Shiner Bock bottle opener. Overall I'm happy with the way it turned out. I'd never built a piece of wood furniture before so I was just kind of winging it based on pictures others have posted. Hopefully someone else will get something out of these pictures as I did with everyone else's pictures.
